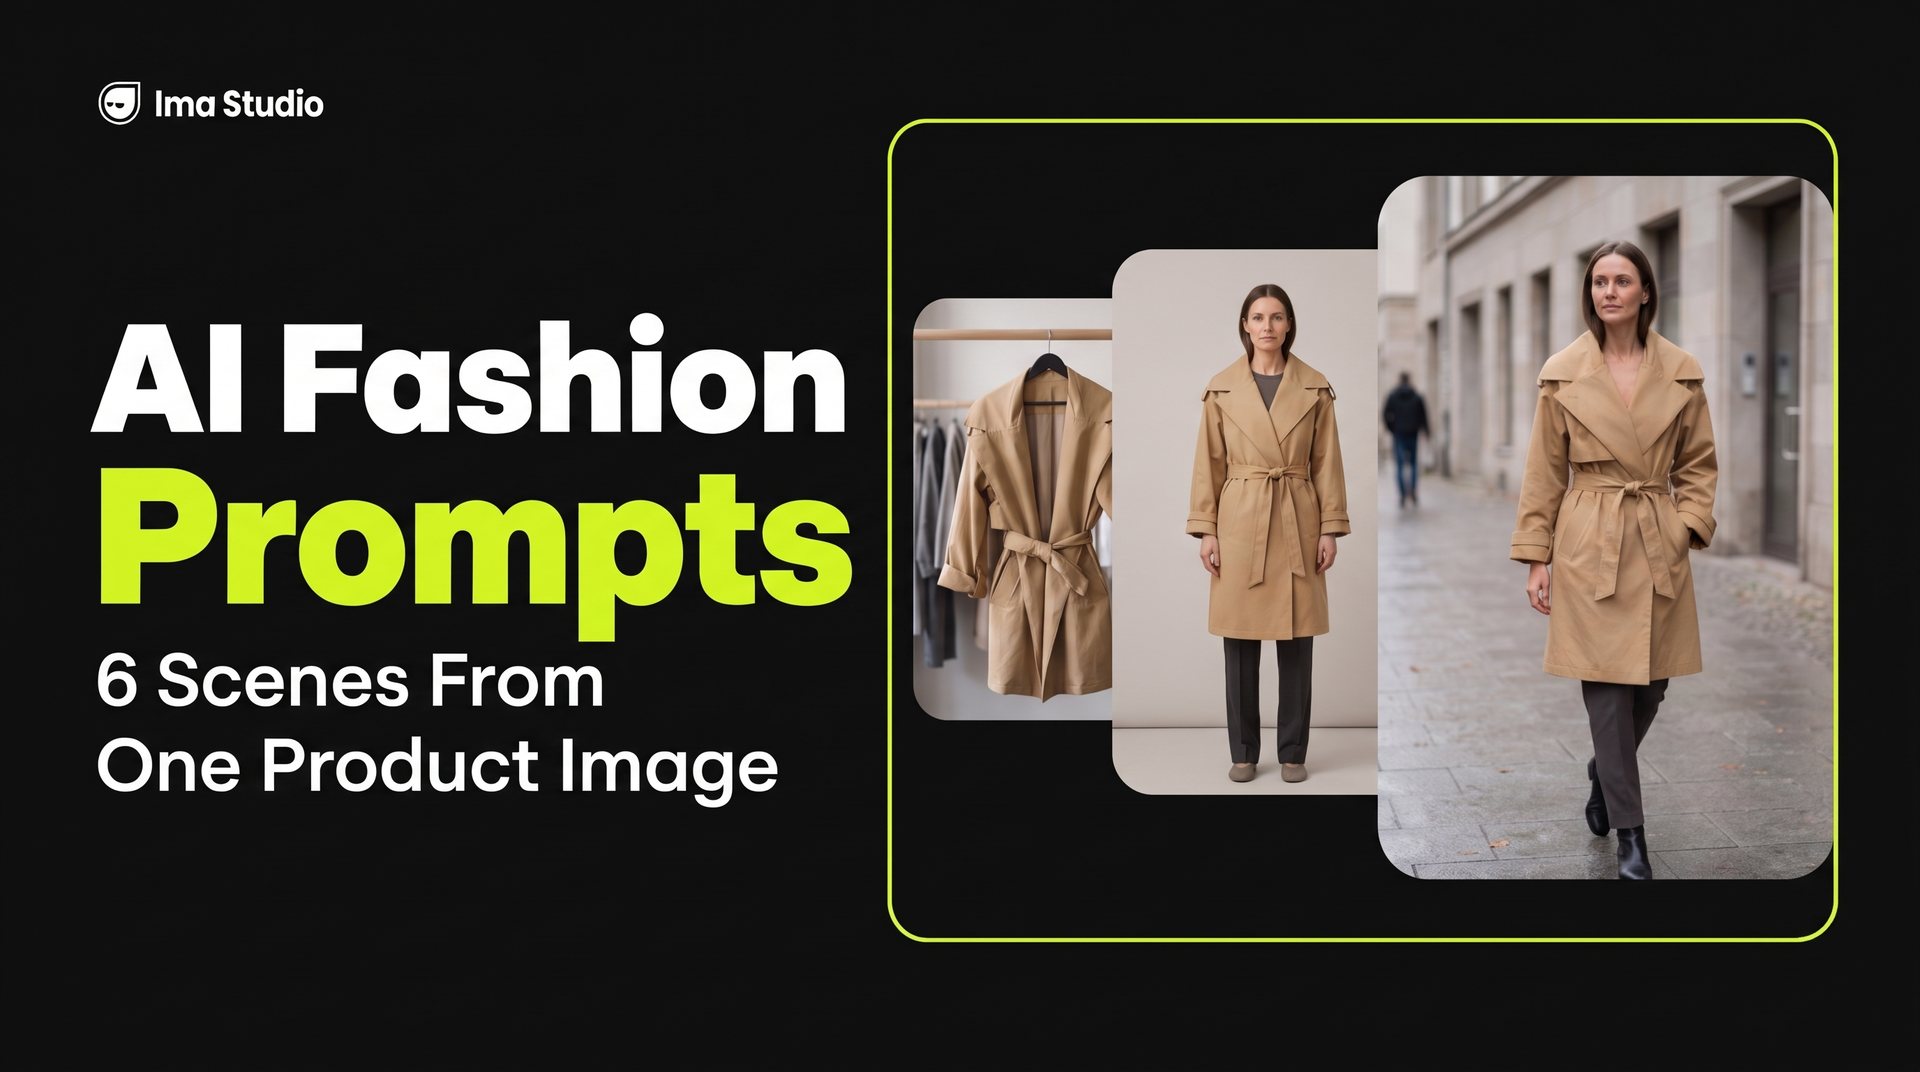
You have a clear photo of a coat. You search for AI fashion photography prompts, paste a “luxury editorial” line into an image tool and get a beautiful coat on a beautiful street. Then you hold it next to your original. The collar is narrower, and there are shoulder tabs your coat never had.
That gap is what this article is built around. Start from a photo of the real garment, say which item is the product, list the details that must not change, and describe only the setting, framing and light. Then compare every result with the original before it goes near a product page.
Below are six scene prompts for clothing brands: a studio view, a boutique rail, a street look, a construction detail, a fitting room and a gift setup. Four of them were run on one real coat photo, and the notes under each image say what held and what drifted.
Create Product Lifestyle Images
Choose the scene by the job the image has to do
“Fashion photography” is a mood, not a brief. Decide what the picture is for first.
| The image needs to… | Start with… | Inspect most closely |
|---|---|---|
| Be the main view on a person | Studio, full length | Collar, closure, sleeve length, hem |
| Sit in a shop or lookbook layout | Boutique rail | Hanger shape, shoulders, what shows through an open front |
| Give a social post some life | Street, walking | Whole garment visible, legs not blending into it, no background text |
| Show how it is made | Detail close-up | Belt, stitching, cuffs, fabric weave |
| Suggest trying it on | Fitting room | Whether the mirror repeats the garment correctly |
| Suit a gifting campaign | Gift setup | Garment unchanged, box and tissue clearly props |
Every prompt here starts from a photograph of a real garment. A text-only prompt can invent a coat. It can’t tell the model what your coat looks like.
Start every prompt with a garment lock
Use a sharp photo of the whole garment with its edges visible. If a seam, belt or closure matters, make sure it can be seen. Then do the step people skip: name the product.
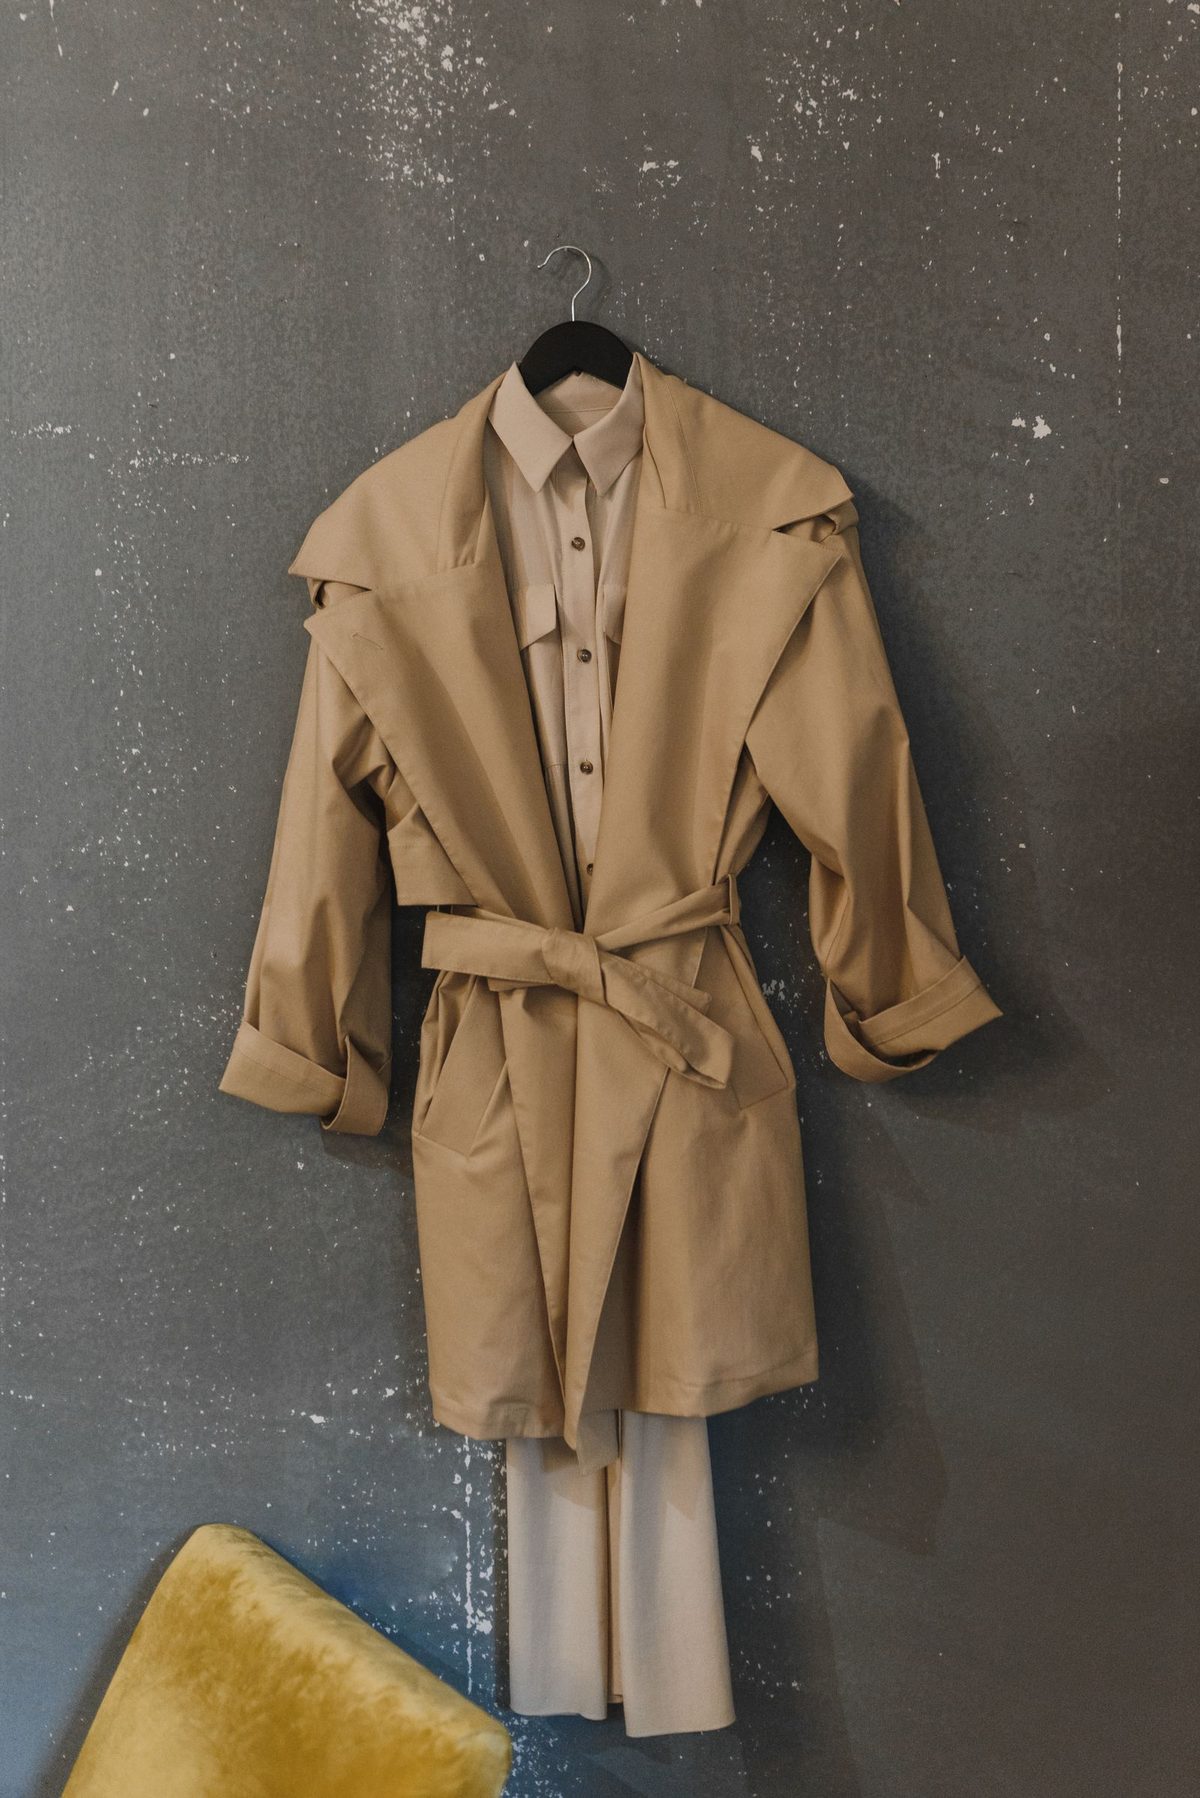
Our reference shows a beige belted trench coat on a hanger, with a cream shirt-dress hanging behind it. A model can easily read both as the product. We had to say that the coat was the product and the shirt-dress was not.
Copy this starter, then add one scene brief from below:
Use the uploaded photograph as the only reference for the garment.
The product is the [colour and garment name] only. [Name anything else in the photo] is not part of the product.
Keep the [collar or lapel shape, closure, sleeve length and cuffs, pocket placement, belt or hem, fabric colour and texture] unchanged.
Show the whole garment, unobstructed.
Do not add labels, logos, lettering, extra buttons, prints or hardware.
Change only the setting, framing and light described below.
This is an instruction and a review standard, not a guarantee. Image models still reinterpret construction, and the examples below show where.
If the garment has to appear on a specific person, or you are putting an outfit onto an existing model photo, you need a different workflow. Our guide to AI model try-on images from clothing photos covers it, and controlling what transfers helps when a reference holds more than one garment.
Six AI fashion photography prompts to adapt
Attach your garment photo, keep the lock above and replace the bracketed details. Each prompt has a different job, so changing “beige” to “navy” does not make a new concept.
About the examples: we made the studio, boutique, street and detail images for this article in an IMA Studio test session, from the single licensed photo above, at 3:4 and 2K. The prompts here are editable briefs adapted from the ones we used, and IMA expanded each into its own generation prompt. We generated six images and kept four. The street scene took three attempts, explained under prompt 3. The fitting-room and gift prompts were not run. The coat is an unbranded stock item, so these images show scene planning. They do not show exact pattern, fabric or fit for a real product.
1. Studio, full length: the clean view on a model
Use this when you need a straightforward view of the whole garment on a person.
Using the garment lock above, create a full-length studio photograph of an adult model wearing the [garment].
The model faces the camera with feet visible and arms slightly away from the body, so the [lapels, cuffs and belt] stay visible.
Plain warm light-grey seamless wall and floor.
A dark neutral top and trousers that do not compete with the garment.
Soft frontal light, a gentle floor shadow and true-to-life colour.
No text, props, captions or watermark.
Output a 3:4 image.
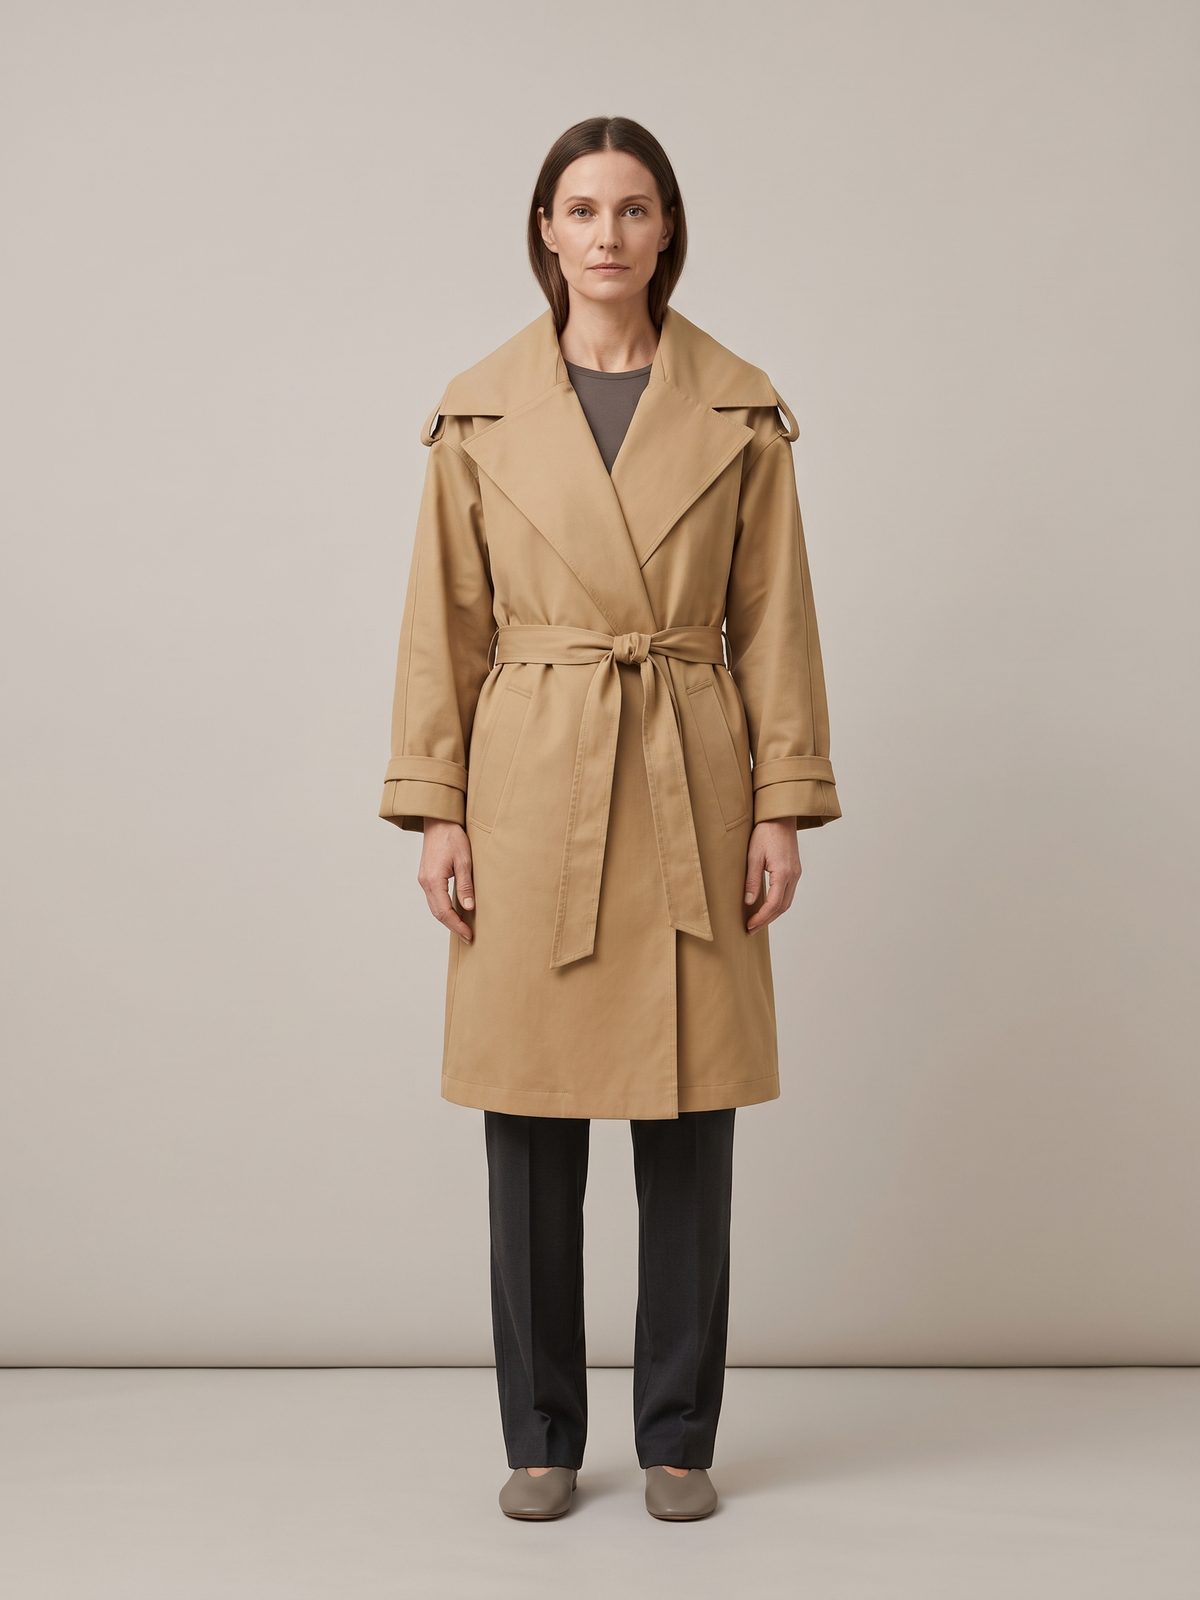
What to check: the belt, diagonal pockets, wide lapel and hem length all carried over. The model also added small shoulder tabs and cuff straps that are not on the reference, and it simplified the layered shoulder into a standard one. A shopper may never notice. A pattern-maker would. Decide which details your brand cannot let drift and list them in the lock.
2. Boutique rail: a hanger display for lookbooks
Use this for merchandising pages and shop-style layouts, where the garment hangs rather than being worn.
Show the [garment] hanging whole on a plain black hanger from a simple wooden garment rail in a quiet boutique.
Keep the [belt] tied as in the reference, with the full garment visible from hanger to hem.
Soft window light from the left. Other garments appear only as soft-focus neutral shapes behind it.
No signs, price tags, readable text or other brand marks.
Output a 3:4 image.
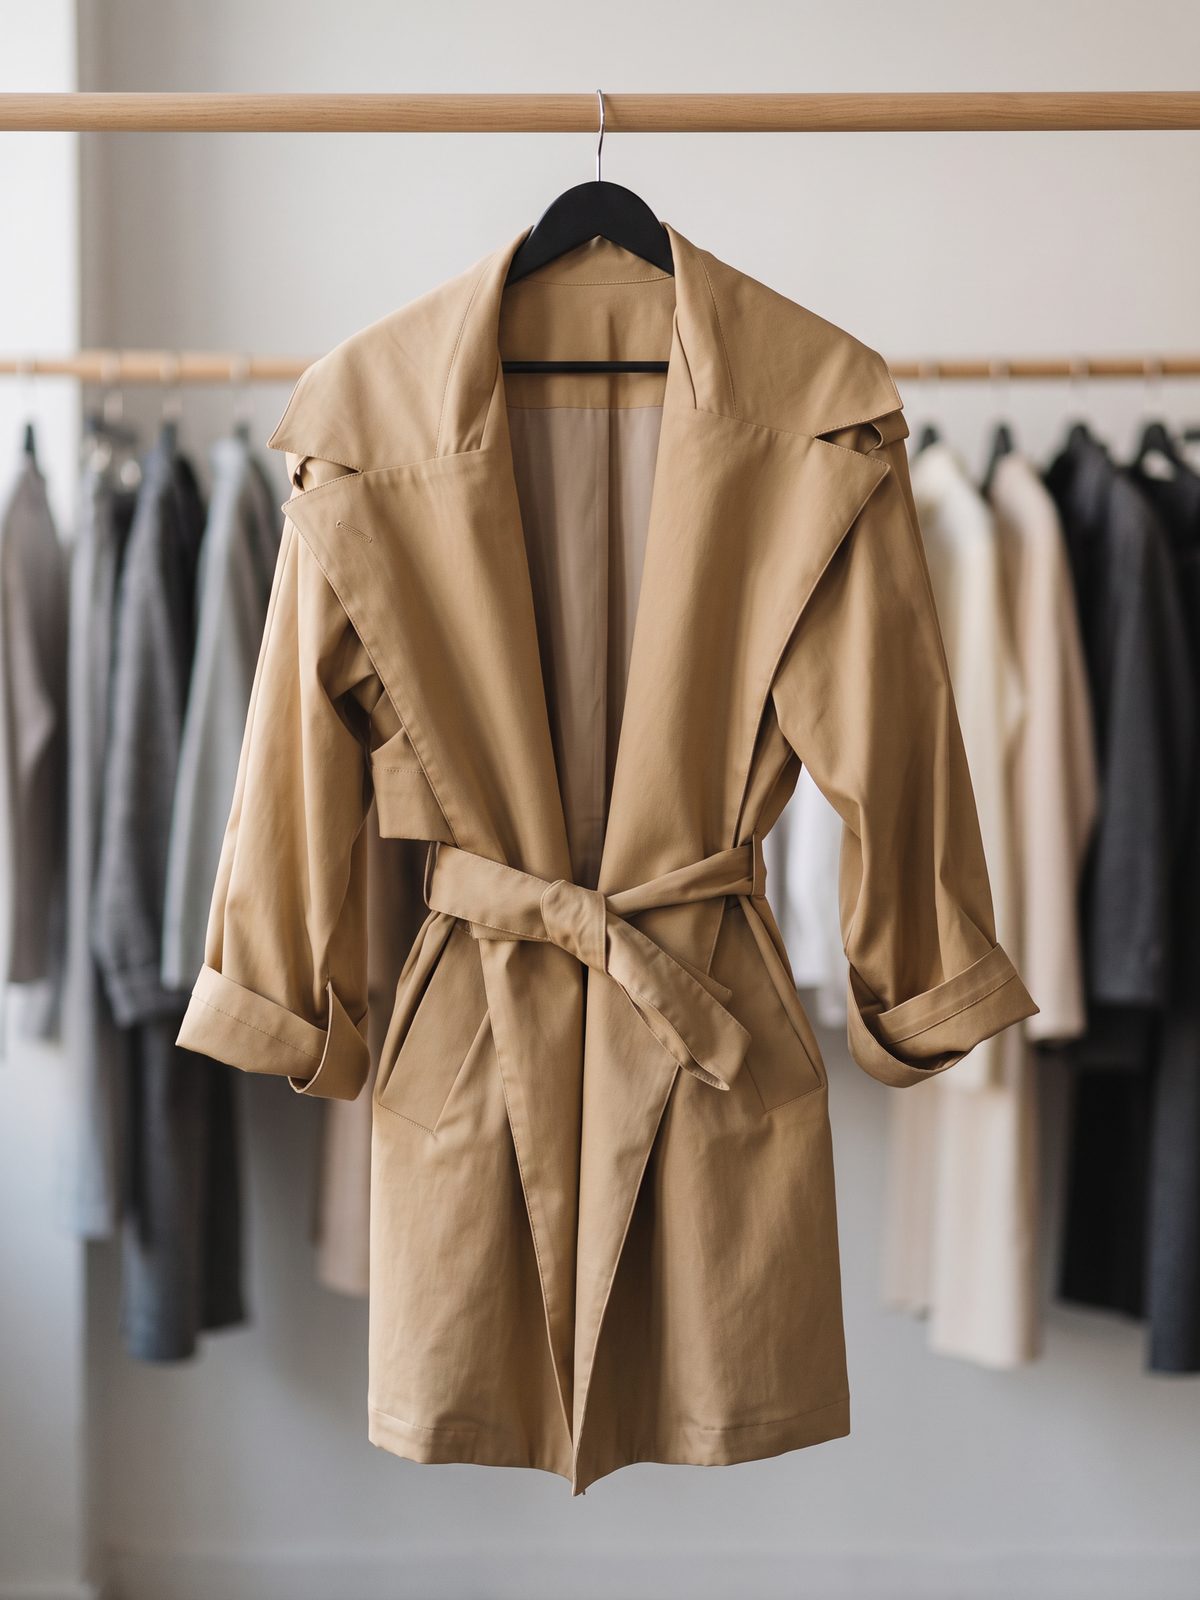
What to check: this was the closest match to the reference. The open front is the thing to watch. In the photo, the excluded shirt-dress showed through it, and the model replaced it with plain beige lining. When you exclude an item, look at what takes its place.
3. Street, walking: a look for social and lookbooks
Use this when the garment needs to move and sit in a believable setting.
Create a street-style photograph of an adult model walking on an overcast autumn sidewalk in a three-quarter view.
Shoot from a little farther back so the head, the whole garment and the shoes all fit, with clear headroom.
The [garment] is worn [closed or belted] as in the reference, with both [cuffs] visible.
Dark charcoal trousers and black boots, so the [garment colour] stays separate from the legs.
Plain stone building facades, wet paving and a few fallen leaves. Only far-away, blurred pedestrians.
No signs, shopfront lettering, posters, vehicles or readable text anywhere in the frame.
Output a 3:4 image.
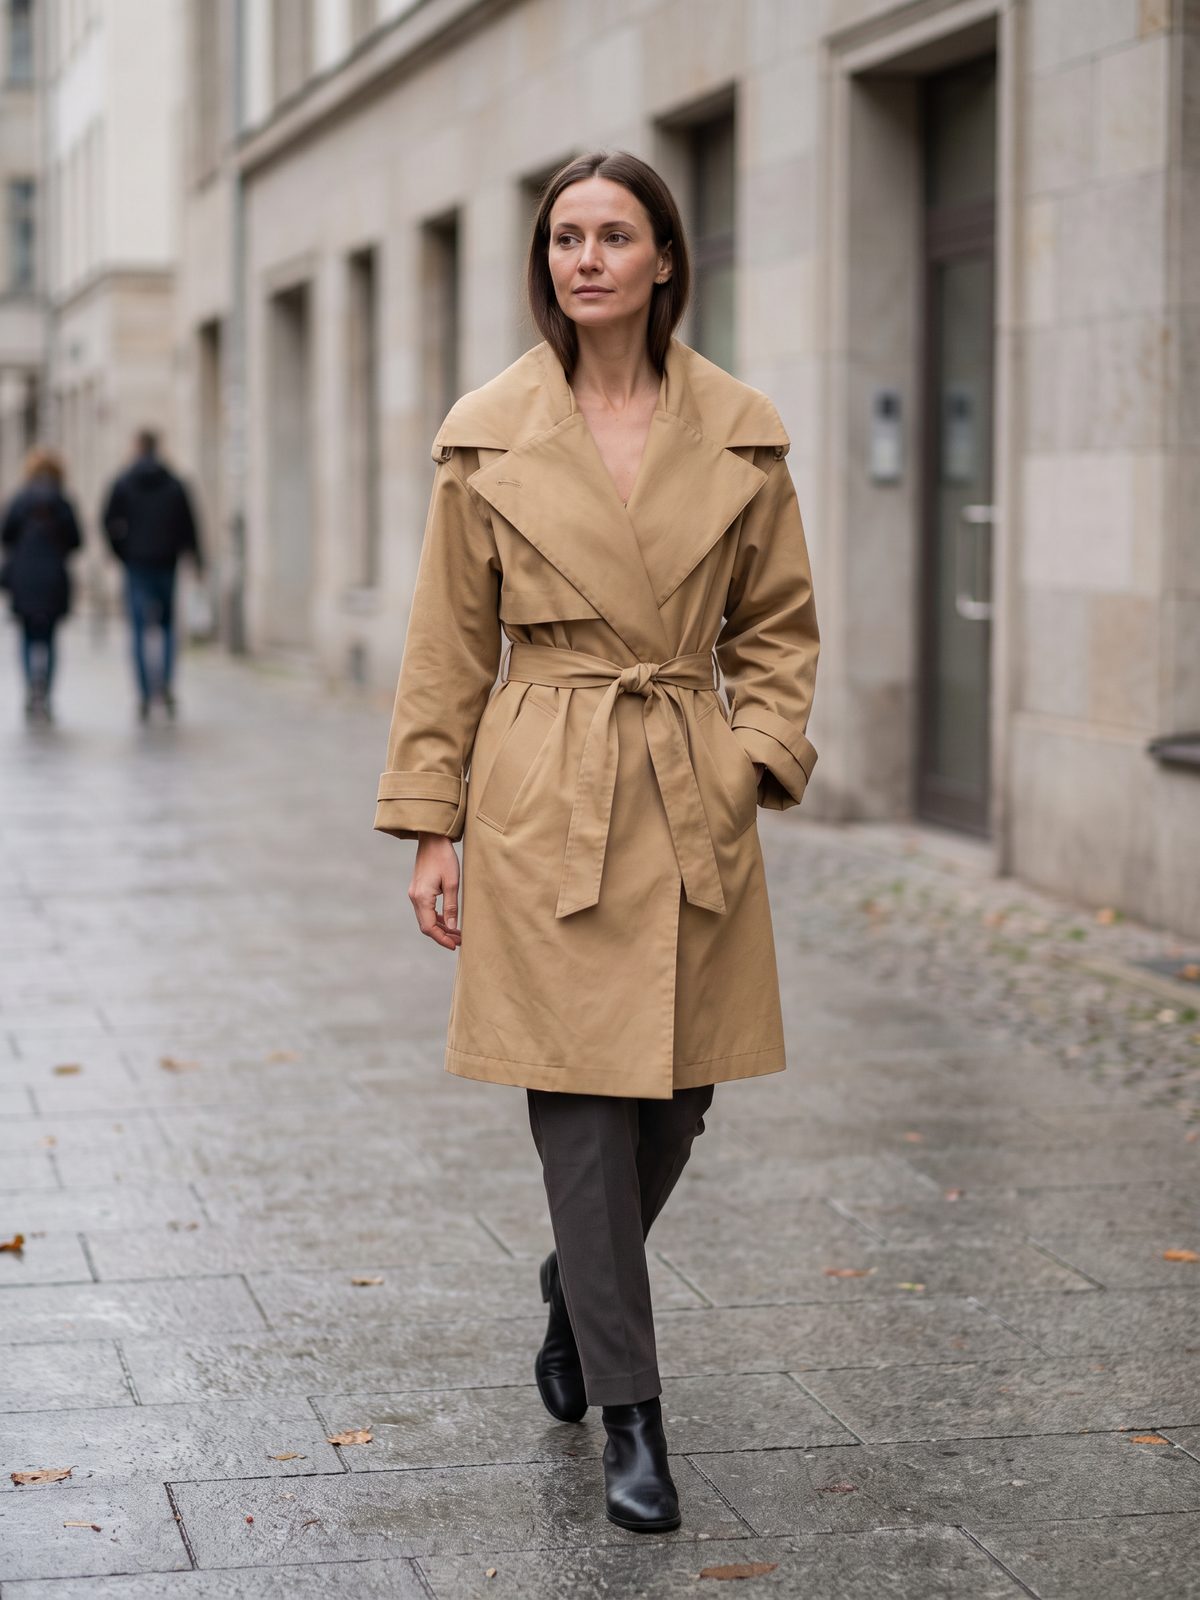
What to check: this one took three tries, and the failures are instructive. The first version had a dark shop sign with smudged lettering in the background. The second removed the sign but cropped the model’s face and paired the coat with trousers of almost the same colour. The version above fixed both by stating the framing and the exclusions outright. Background text is easy to miss at thumbnail size, so view the full frame. The shoulder tabs from prompt 1 appeared here too.
4. Detail close-up: show the construction
Use this for the belt, cuff, pocket or stitching that a shopper will want to inspect.
Create a tight close-up of the [garment]'s [belt knot, one rolled cuff and the pocket edge], cropped so no face appears.
Soft side light that shows the fabric weave and stitching, with shallow depth of field.
Keep the colour, seam placement and stitch rows from the reference. Do not add hardware or distressing.
Output a 3:4 image.
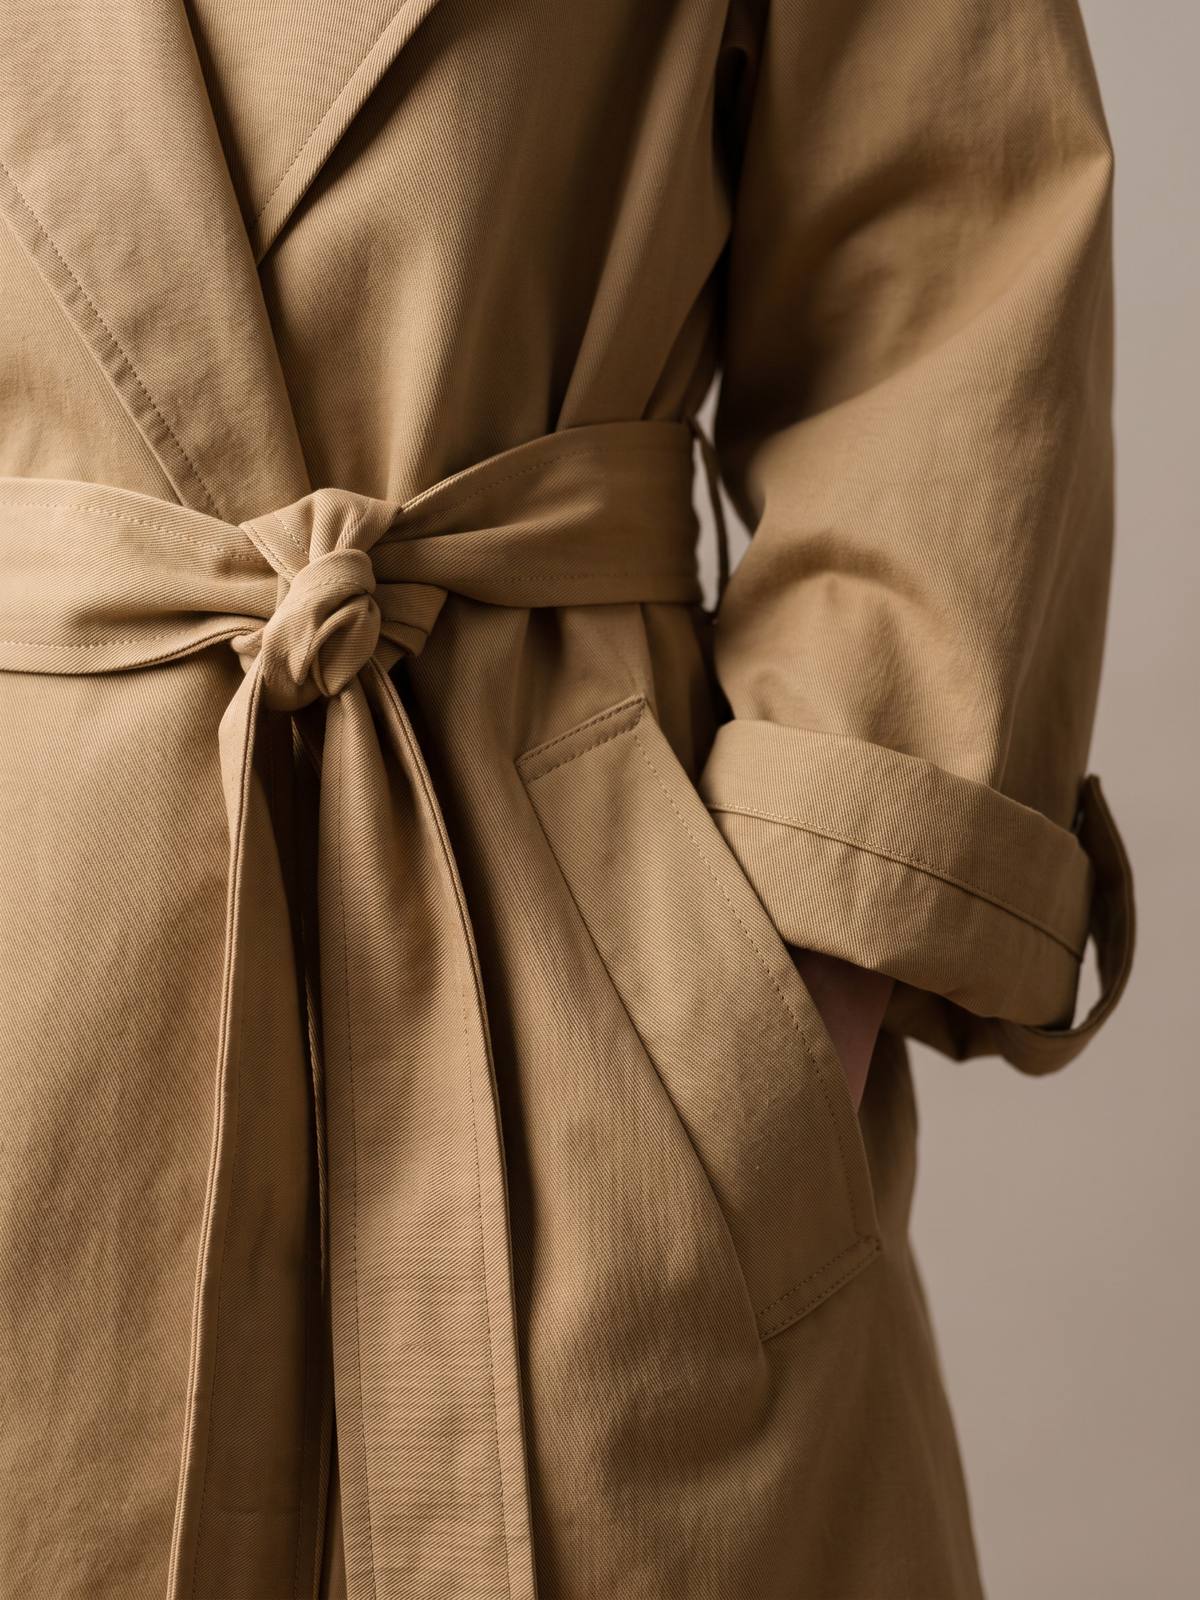
What to check: the twill weave and stitching look convincing, but the knot is chunkier than the reference and a dark strap shows behind the cuff. A generated close-up looks like fabric. It is not evidence of your fabric. If the weave or finish is a selling point, photograph it for real.
5. Fitting room: a try-on mood (not run in our test)
Use this for a lifestyle section about trying a piece on. Mirrors are where duplicated details go wrong, so check the reflection closely.
Show an adult model in a boutique fitting room, standing beside a full-length mirror and wearing the [garment] as in the reference.
The reflection must show the same garment details as the person. Do not add a second garment or hanging items that cover it.
Neutral curtain and wall, soft overhead light.
No signs, price tags or readable text.
Output a 3:4 image.
What to check: compare the front of the garment with its reflection. If the mirror shows a different closure or collar, regenerate rather than crop.
6. Gift setup: a folded garment with packaging (not run in our test)
Use this for a seasonal campaign where the garment is folded rather than worn.
Place the folded [garment] on a plain wooden table beside an open gift box and loose tissue paper.
Keep the visible colour, texture and any visible closure details of the garment unchanged. The box and tissue are props, not part of the product.
Warm neutral tabletop, soft window light, slightly elevated camera angle.
No ribbon around the garment, no printed text and no extra products.
Output a 3:4 image.
What to check: folding hides construction, so this view cannot stand in for a product page. Make sure the box does not suggest packaging that you don’t actually ship.
Write your own AI fashion photography prompt
Most good prompts have the same five parts. Fill each one with a concrete detail instead of an adjective.
| Part | What it settles | Example |
|---|---|---|
| Garment lock | What must not change | “Keep the wide lapel, tied belt, rolled cuffs and knee-length hem” |
| Shot | Framing and crop | “Full length, feet visible” or “waist-up, subject on the right third” |
| 环境 | Where the garment sits | “Plain grey studio wall”, “quiet boutique rail” |
| Light | Direction and quality | “Soft window light from the left, gentle contact shadow” |
| Exclusions | What must not appear | “No signs, lettering, price tags, extra buttons or watermark” |
Choose the output size in the tool’s settings as well as in the prompt. Asking for a wide layout does not replace the aspect-ratio control.
Get better results by reviewing like an editor
- Compare with the source at full size. Check the collar, closure, cuffs and hem against the original, not a thumbnail.
- Change one thing at a time. Keep the lock and swap the scene. If you change the pose, light and setting together, you can’t tell which one broke the garment.
- Name the failure in the next request. “No signs anywhere” and “leave headroom above the head” worked better for us than adding more adjectives.
- Keep text, prices and logos out of the generated image. Add them afterwards in an editor.
- Don’t use a generated image to claim fit or fabric behaviour. Measurements, stretch, opacity and weather resistance come from product data and real photographs.
- Store the source photo and the prompt next to each approved image, so the next person can repeat or correct it.
Our guides to 拍摄没有模特的服装照片 and to creating product scene images from one reference go further on the no-model and everyday-scene cases.
常问问题
Do I need a real photo of the garment?
For an item you sell, yes. A text brief can explore an imagined design, but it can’t show your actual product. Start from a clear photo and keep it next to the result.
Can a generated image show how the garment fits?
No. A generated pose can suggest a direction, but it does not establish measurements, stretch, comfort or how the fabric behaves. Use verified product information and real photographs when shoppers need to judge fit.
How should I describe the model?
Describe an adult model’s general look, pose and expression, and keep the casting brief the same across a collection. Don’t present a generated person as a real customer or an endorser. A generated person can change from one image to the next, so check each image on its own.
Which image size should I use?
Pick the placement first. We used 3:4 portrait for all four examples, set in the tool’s size controls.
结论
Start with one garment, one clear photo and one scene. Lock the details that cannot change, review each result against the original, and build more variations only after the design survives the check.
Create Product Lifestyle Images
关于作者