On the Creation page you pick a model, upload your images, and write the prompt yourself. This guide is organised around the four things you can do there: generate an image, edit an image, use reference images, and make a video.
Learn the five-part basics first, then jump to the task you are working on. Every chapter stands on its own. Sections marked we ran this come from generations we made on the Creation page; sections marked vendor guide come from the model maker’s documentation, which we have not re-tested.
Last checked: November 5, 2026. Models change; if your result differs from this page, tell us which model you used.
1. The basics: five parts every prompt needs
Whatever the task, a strong prompt answers five questions. Fill each with a concrete detail instead of an adjective.
| Part | Ask yourself | Example |
|---|---|---|
| Sujeto | Who or what is in it? Be specific | “A black leather and walnut lounge chair”, not “a chair” |
| Action | What is happening, even in a still image? | “A woman lifting a ceramic mug with both hands” |
| Location | Where is the scene? | “A warm modern living room with an oak wall” |
| Composición | Where is the camera? | “Full-length, feet visible”, “macro close-up”, “view from above” |
| Estilo | What should it look and feel like? | “Premium editorial photography, soft window light, warm neutral tones” |
Then write it as two to four natural sentences, subject first:
- Weak: “A woman drinks coffee.”
- Better: “A woman sits by a café window, holding a ceramic mug with both hands. Soft daylight from the left, warm highlights on her face, shallow depth of field, editorial photography.”
The better version describes how things happen, not just what happens.
Three habits that help in every task:
- Write commands, not conversation. Drop “please” and “can you”. “Place the product on a marble counter” beats “Could you make a nice product shot?”
- One idea per phrase. “Soft window light from the left” is usable. “Beautiful amazing lighting” is not.
- Name the subject first. If the model has to choose between your product and a beautiful scene, it often favours the scene.
2. Task: generate an image from text
Take the five parts from chapter 1 and describe the picture you want. Here is a complete starter:
A [product] on a warm oak table beside a window, soft morning light,
shallow depth of field, premium editorial photography, warm neutral
tones. The product is centred and fully visible. No text, no watermark.
Adding text to the image — vendor guide (Google and OpenAI image guides): put the exact words in quotation marks and describe the typography:
A minimal poster of [scene], with the words "[YOUR TEXT]" in small
white serif letters at the bottom. No other text, no logos.
Keep the words short. Across our own product tests, generated small print and labels were not reliable, so keep prices, long copy and exact logos out of the generated image and add them afterwards in an editor.
Size and ratio belong in the tool’s controls, not the prompt. Writing “wide layout” in a prompt does not replace the aspect-ratio setting.
Common mistakes:
- A list of adjectives instead of a scene. Write what is in the picture first, style second.
- The subject buried at the end. Start with it.
- Long copy asked for inside the image. Add it in an editor afterwards.
3. Task: edit an image
Vendor guide (Dreamina / Jimeng editing formula).
An edit prompt is not a description of a new picture. It has three parts, plus a keep-list:
[Action] + [which object] + [what it should become].
Keep [subject, pose, background, lighting, camera angle] unchanged.
Repeat the keep-list every round. Models drift when a round only says what to change and not what to protect. We have not run a dedicated edit test for this page; the formula is the vendor’s, and the keep-list habit matches what we saw in our own generation tests.
Starters:
Swap the background
Replace the background with a plain warm-grey studio wall. Keep the
subject, pose, framing and lighting direction exactly the same.
Change only the light
Change only the lighting to golden-hour side light with long soft
shadows. Keep the subject, composition and camera angle unchanged.
Remove an object
Remove the [object] from the [position]. Fill the area with the
surrounding [surface]. Keep everything else unchanged.
Common mistakes:
- The whole image changed. The round did not protect the rest. Lengthen the keep-list, not the description of the change.
- Several edits at once. Change one thing per round, or you cannot tell which edit broke the result.
- “Make it more realistic.” Name the visible defect instead: “Keep the bottle shape and move the towel behind it.”
4. Task: use reference images
We ran this on the Creation page (image-to-image, Seedream 5.0 pro).
How @ works. After you upload images, refer to them in the prompt with @: @Image 1 is the first image you uploaded, @Image 2 is the second, and so on. We verified on the Creation page that the image numbering follows upload order. The model maker’s guide uses the same notation, and also describes @Video and @Audio references for video models (vendor guide; we have not tested those).
When you upload more than one image, the model does not know which one to copy. Tell it, in the first sentence, what each image is for:
Use @Image 1 only as the [product identity] reference
and @Image 2 only as the [composition and lighting] reference.
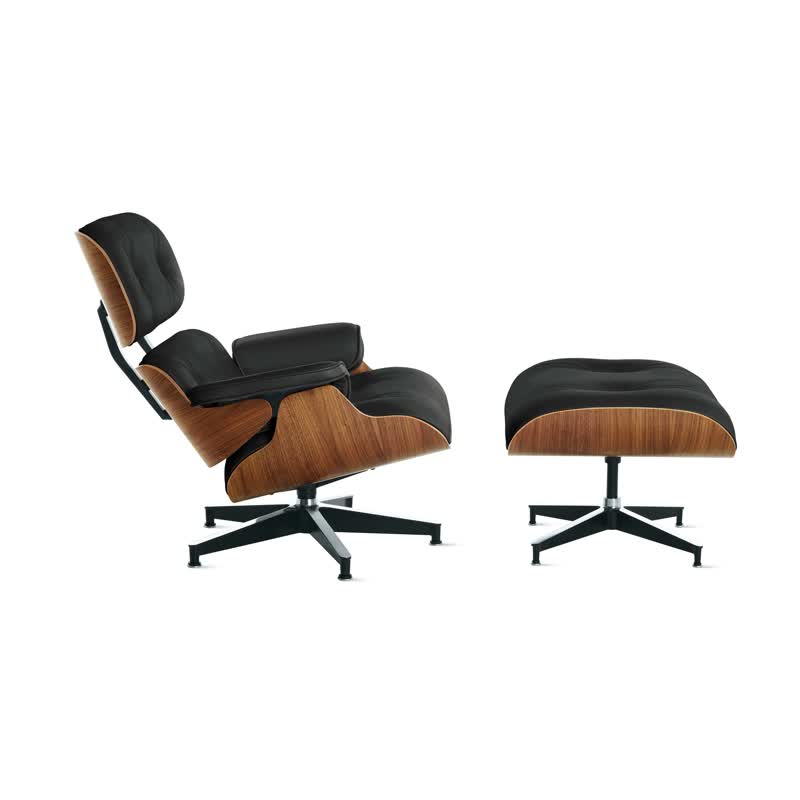
Then say what to take from each, and what to leave behind. Here is a complete prompt we ran, with two uploads: a product photo of a lounge chair, and a styled interior photo whose layout we liked. It is written with “image 1 / image 2”, which works the same way as @Image 1 / @Image 2.
Show the full prompt we ran
Use image 1 only as the furniture identity reference and image 2 only
as the composition and lighting reference. Replace every rust-red
sculptural lounge chair in image 2 with the same black leather and
walnut lounge chair from image 1; omit the ottoman so the chair is the
clear single subject. Preserve image 2's three-panel editorial
composition: one large centered interior frame and two narrow cropped
side views, all showing the same chair in a warm modern living room.
Preserve the warm oak wall, cream rug, restrained decor, natural side
light, long soft shadows, premium architectural photography, and calm
high-end editorial mood. Keep the chair's molded walnut shells, black
leather cushions, armrests, five-star base, proportions, and viewing
angle physically accurate and consistent across all three panels.
Remove the 4K text. No logos, no captions, no watermark, no extra
chairs, no distorted furniture, no collage seams.
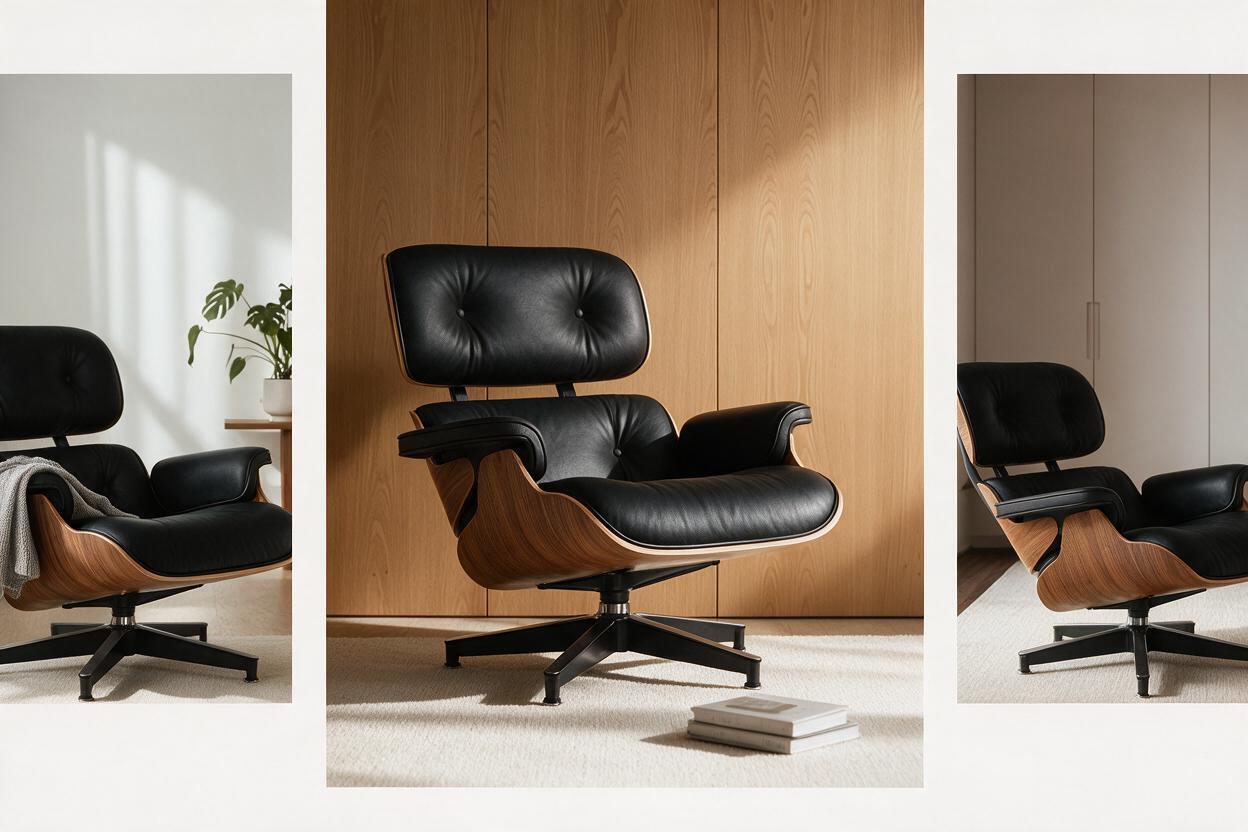
Three things in that prompt did most of the work:
- One job per image. “Image 1 only as identity, image 2 only as composition and lighting” stops the model from blending the two.
- A keep-list for the product. Shells, cushions, armrests, base, proportions, viewing angle. List the details you would notice if they changed.
- Named removals. “Omit the ottoman”, “remove the 4K text”. If the reference contains something you do not want, say so explicitly.
The same structure works for other products. We used it for a handbag and a hair-mask jar with the same first sentence and a product-specific keep-list.
A shorter starter — tested, shortened from the prompt above:
Use @Image 1 only as the product reference. Place the product on a warm
oak table beside a window, soft morning light, shallow depth of field,
premium editorial photography. Keep the product's shape, colour, label
and proportions unchanged. No text, no watermark.
Common mistakes:
- The result looks nothing like your photo. The prompt did not say what the photo is for. Add the “use @Image 1 only as…” sentence and a keep-list.
- Your words and your image disagree. The reference usually wins. In one of our video tests the prompt described a green smartphone while the uploaded image showed a black one, and the result contained both. Make the text match the image before you generate.
- No reference for something that already exists. A text-only prompt can invent an item but cannot tell the model what yours looks like. Upload a photo.
5. Task: make a video
We ran this (Seedance 2.5, two published prompts).
“Make it cinematic” gives a video model nothing to do. Both video prompts we published have the same three blocks:
1. Rules at the top. Visual style, continuity, and what the references are for:
Use the uploaded reference images strictly. Preserve the same model,
facial identity, hairstyle, outfit, and every product throughout.
All packaging, colors, logos and proportions must remain identical
to the references. Use only the exact products shown in the uploaded
images. Do not add, invent, substitute, or duplicate any products.
One continuous shot. Zero cuts.
That “use only the exact products shown” line earned its place. An earlier version without it invented extra lipstick, mascara and brushes that were not in the reference.
2. Time-stamped shots. Each block starts with a time range and says what happens and what the camera does:
[Start]–[end]s — [shot name]
What happens: ...
Camera: ...
Give each shot one camera move, and lead with it when the camera move is the point: “Slow dolly-in toward the product” before the scene description. If you change the video length in the settings, rescale the timestamps to match.
3. Restrictions at the bottom. Repeat the biggest risks as hard rules: no extra products, no changed packaging, no distorted hands, no subtitles, no watermark.
Treat motion instructions as requests, not guarantees. We asked for time to slow to a crawl and for an orbiting camera; across runs, one camera moved close to individual products and another held a low angle. Generate a few takes and keep the one that matches your idea.
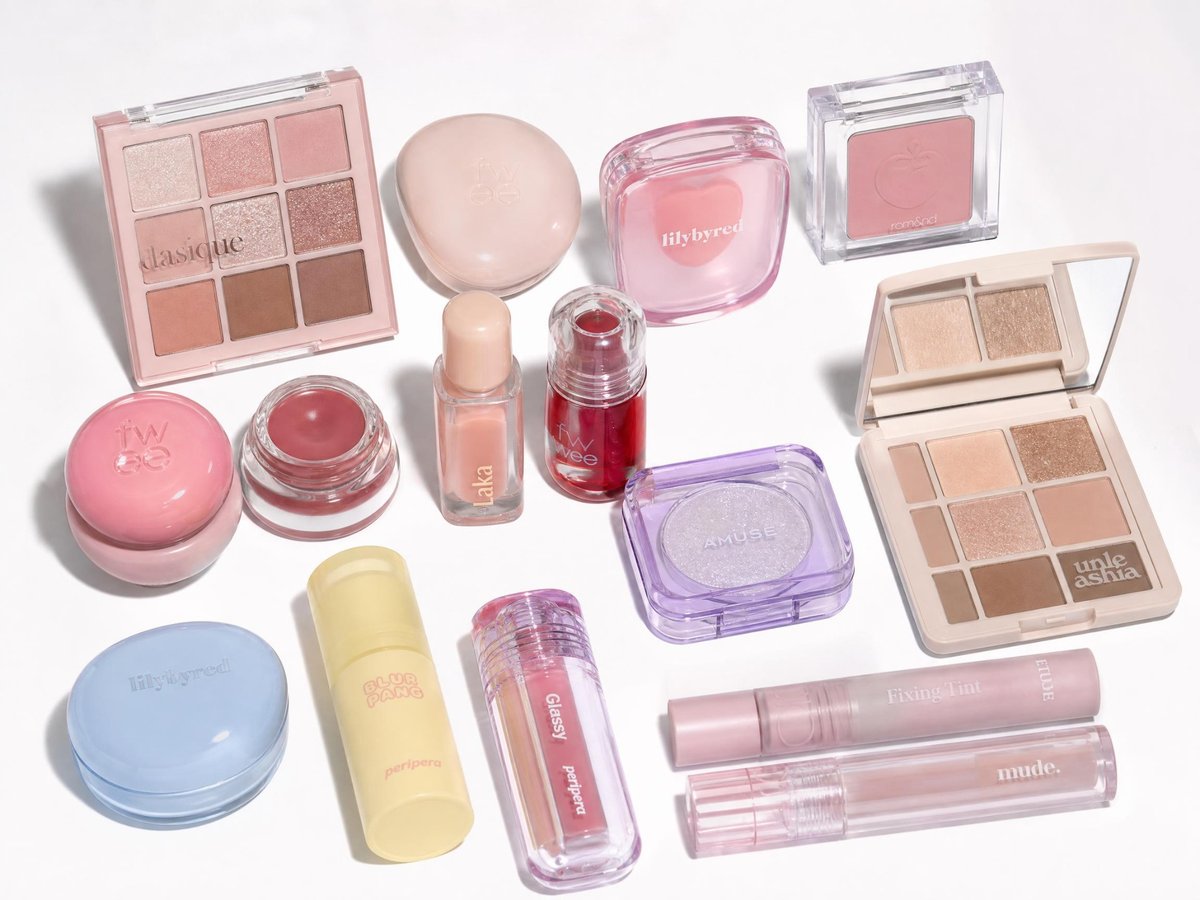
For a talking UGC-style video, the same structure works with dialogue: one shot per block, the exact spoken line in quotes, and a product lock paragraph so the packaging survives close-ups. Our skincare prompt used five shots, each with one job: hook, texture, application, finish, and a final product-and-face frame.
Starters:
One camera move — structure tested in our video runs
Slow dolly-in toward [subject]. [Subject] [does one action]. Soft
daylight, shallow depth of field. One continuous shot, no cuts.
Use only the objects shown in the uploaded image.
Talking UGC opener — tested, shortened from the skincare prompt
Close-up: she holds the product beside her face and says, "[your
line]". Handheld phone footage, natural daylight, no beauty filter.
Keep the packaging identical to the uploaded image.
Common mistakes:
- The video added objects you never uploaded. Add “use only the exact products shown in the uploaded images; do not add, invent, substitute, or duplicate any products.”
- One long paragraph describing a mood. Split it into time-stamped shots.
- Judging on one take. Motion varies between runs; generate a few and keep the best.
Full prompts and results: the bullet-time product video y el skincare UGC ad. For camera language, see 20 indicaciones de movimiento de cámara con IA.
6. Techniques that work in every task
Exclusions: name the exact failure. Whether negative instructions help depends on the model:
| Fuente | What it says or what we saw |
|---|---|
| Our Seedance 2.5 runs (we ran this) | Short, specific exclusions worked: “no altered labels or logos, no beauty filters, no plastic skin, no fake cream physics” |
| BytePlus / Dreamina guide (vendor guide) | Constraint sentences are supported, for example “keep it subtitle-free”, “do not generate a logo or watermark” |
| Google and Runway guides (vendor guides) | Prefer positive phrasing: describe what you want, not what you do not want |
The practical rule: describe what you want first, then add an exclusion only for a mistake you have actually seen, in plain words. “No extra text” beats “no bad quality”. A tested add-on for a prompt that keeps failing the same way:
No extra products, no changed labels, no distorted hands, no text
overlays, no watermark.
Iterate one change at a time.
- Generate a few takes. Do not judge a prompt on one result.
- Compare each result with your reference at full size, not as a thumbnail.
- Name what is wrong in the next request.
- Change one thing, keep the lock and the keep-list, and run again.
- Save the reference and the prompt next to each result you approve, so you or a colleague can repeat it.
7. If it still looks wrong
| What went wrong | Try this | Chapter |
|---|---|---|
| The result does not look like my product photo | Give each uploaded image one job: “@Image 1 is the product, @Image 2 is the style” | Imágenes de referencia |
| I asked for one change and everything changed | Say “change only X” and list what stays the same | Edit an image |
| The video added objects I never uploaded | Write “use only the exact products shown in the uploaded images” | Make a video |
| The video ignores the colours I described | The reference image wins over your words; make them match | Imágenes de referencia |
| The text in the image is garbled | Quote the exact words, keep them short, add final text in an editor | Generate an image |
| The image has the wrong shape | Set the ratio in the tool’s controls, not the prompt | Generate an image |
| I changed three things and cannot tell what helped | Change one thing per round | Techniques |
If you send us feedback, include:
- Which model and mode (text-to-image, image-to-image, image-to-video)
- The full prompt, copied as text
- The reference image or images you uploaded
- The result, and what you expected instead
With those we can usually tell whether the cause is the prompt, the reference, or the model.
8. FAQ
Is a longer prompt better?
Only if every line does a job. A single product image needs a few lines. A multi-shot video needs more, because each shot has its own job.
Do I need a reference photo?
For something that already exists, such as a product you sell, yes. Text alone cannot tell the model what your item looks like.
Can a prompt guarantee the result?
No. A prompt is an instruction and a review standard. Check every result against your source, at full size.
Why does the same prompt give different results?
Generation varies between runs. Generate several takes and keep the best one.
Should I write in English?
Our published prompts are in English and that is what we test. If you write in another language and get inconsistent results, try an English version of the same prompt.
9. Where to go next
- GPT Image 2 prompt guide with 35 examples
- Seedance 2.5 prompt tutorial: a UGC ad
- 20 indicaciones de movimiento de cámara con IA
- Product scene images from one product photo
Acerca del autor